Flossing is a vital aspect of any dental care personal hygiene routine. With braces, there are extra places where food can get stuck. That stuck-on foods might cause enduring harm: plaque, tooth decay, gum sickness. For those that have braces, flossing is completely necessary to avoid bacterial growth and infections that lead to teeth cavities and tooth loss.
 Braces bring a lot of hard-to-reach areas which are tough to thoroughly clean with dental floss only. Foods can get caught between the tooth and below your braces, resulting in oral plaque accumulation and tooth decay. Another important reason for flossing would be to eliminate foods contaminants that come to be stuck within the brackets of your respective braces. It will help stop tooth decay and dental diseses like gingivitis. Gingivitis brings about soreness from the gum line and leads to redness, inflammation, bleeding during brushing or flossing, bad breath, soreness when nibbling particular foods, pain when wearing dental home appliances like orthodontic bands or bridges, etc.
What Floss Should I Use With Braces?
Any floss that you can use to remove food residue and stop plaque and tartar build up is better than not using any floss at all, but flossing might be a little more complicated for those with braces compared to those without having. If you’re having trouble maintaining a consistent brushing and flossing a regimen with braces, think about using one of these tools that may create the method simpler.
Traditional Floss
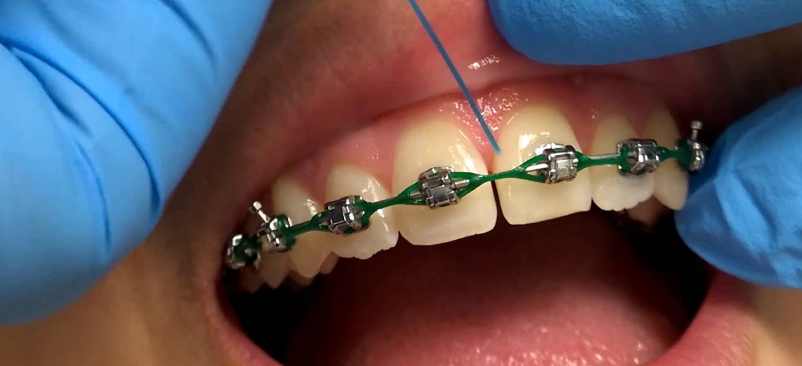
Flossing, or making use of wax tart-protected thread to clean between tooth, scrubs the tough-to-reach places that can be overlooked by brushes, particularly with mounting brackets and wire connections in somehow. Floss between each tooth once a day, and employ a small interproximal brush to clean round the brackets and beneath the wires.

Traditional dental floss using steps.
1.Cut a piece of floss (no less than 18 ins).
2.Thread your floss down or up with the space between pearly whites and also the wire. Make sure you don’t pull around the floss as you may do this.
3.Wrap the ends from the floss around your index fingers so the floss is stretched between the teeth and you can shift it very easily.
4.Push the floss all around in the middle your tooth. Curving it around your teeth in the “C” form offers greatest flossing coverage.
5.Eliminate the floss from your hands and fingers and thoroughly unthread it. You don’t would like to pop your floss out of your bracket.
6.Cutting a new section of floss, perform repeatedly steps from two to five until you’ve flossed your entire tooth.
Another tip:
Use wax-covered thread for flossing with braces. It is smooth and soft to get the job done without the fraying.
Who should use floss?
Everyone ought to floss. Flossing is a crucial part of oral health to reduce the risk of chewing gum condition and cavities.
What are the benefits?
- Very easy to control
The primary benefit of using floss is control easily. Flossing manually enables you to meticulously wipe lower each teeth, in a down and up action, as well as maneuver the floss between the teeth.
- Able to clean each tooth in full
It removes germs, oral plaque, and food debris from between tooth. Utilizing floss also permits you to celan each tooth thoroughly clean of tacky plaque before it can turn into tarter.
What Are The Disadvantages?
- Unable to Reach some places
A lot of people might be unable to attain specific parts of the jaws very easily when relying only on floss. You may also have a hard time getting between teeth that are very close together. It’s important to rinse your mouth after you floss. This helps remove plaque and residue scraped free from teeth.
- Can Cause Your Gums to Bleed
If you floss very far lower below the gumline or too forcefully, your gum area may possibly bleed.
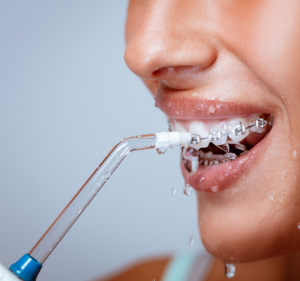
Water Flosser for Braces
This is a wonderful choice if you or your child has issues with normal floss and braces.
Steps:
1.Fill up the machine with water. With some designs, you could add mouthwash if possible.
2.Make sure the tip of the flosser is on correctly. It may be untidy once they aren’t.
3.Position the flosser on the drain. Check the water stream situation and adjust the pressure to the level of comfort.
4.Put the flosser tip inside your month and slim on the drain.
5.Turn your flosser on and guide the water stream along your gum line and between all your the teeth.
6.Enable the normal water to drain from the mouth or spit it into the sink.
Who Should Use a Waterpik?
A Waterpik may also be easier to use than standard floss for people with arthritis, or for anyone who finds string floss difficult to maneuver and work with.
You could possibly choose to use a Waterpik instead of floss in the event you:
- Wear braces
- have nonremovable bridgework
- have crowns
- have dental implants
A Waterpik can be simpler to use than standard floss for people who have joint disease, or for anybody who finds string floss hard to maneuver and work with.
What Are The Benefits?
- Easy to use
Waterpiks are easy to use. Some people can experience a studying curve when determining their most cozy water temperature and energy setting.
- Gets in hard-to-reach areas
By using a Waterpik may be particularly ideal for entering into tough-to-reach regions of the mouth area, tightly spaced teeth, and periodontal pockets which may be caused by very early gum disease. They can also help to maintain breath fresher, much longer, which happens to be an extra additionally.
- Cleans between tightly spaced teeth
What Are The Disadvantages?
- might not get rid of all plaque buildup
The rinsing motion of Waterpiks might not be enough to take out plaque buildup completely from the work surface of teeth. A lot of people prefer to use string floss very first, to scrape off and loosen plaque. A Waterpik may then be employed to efficiently wash out residue and plaque left out.
- May be expensive
Waterpiks are safe for use and have no chance, other than towards the finances, when compared to conventional string floss.
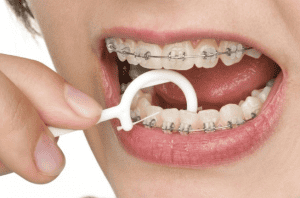
Floss Threader for Braces
You can speed up the traditional flossing method with an inexpensive but indispensable tool. This small, plastic tool is called a floss threader. A floss threader helps you pull floss behind the braces wire easily.
Super Floss for Braces
How you can floss your braces utilizing a special floss named super floss. Let’s visit a needle like tip that is more hard than wax tart. So It’s simple to thread.

1.Begin by gently pressing it through somewhere between the teeth.
2.Apart and gently pull it by way of, You then use your fingertips to bend the floss throughout the tooth using the form of the teeth. Do not make the oversight of flossing just all around. You have to bend the floss and after that gently simplicity it down into the gum. There’s a compact very little budget place you could let the periodontal to go into very easily.
3.To the other side and then clear up and down just to where that gum pocket. Begins several times once you’re done with that along with your tooth can gently bring it on the front side. You may clear the wire and ears around the bracket when you see any food debris or sticky black.
4.Just pull it out repeat or perhaps the up coming tooth drive it by means of children in the periodontal put it very gently all around several times make sure the inside floss is going through the same way as the outside floss nevertheless, you don’t floss such as this or that way constitute the notice C then form it to the opposite side down and up should your pearly whites allow gently bring it through to the leading lean the floss stay in the bracket and discharge.
Flosser for Braces
Dental floss pick is non reusable products which hold a tiny piece of dental floss. You can get floss picks for braces inside the very same aisles traditional floss.
Steps for using your flossing pick:
1.Determine the end that suits between floss and teeth (some possess a thinner end).
2.Series the floss portion up between teeth. You will would like to stand looking at a mirror.
3.Floss down and up between your the teeth, exactly like you’re using regular floss.
4.Be delicate and careful when you floss.
5.Eliminate the flossing pick and recurring until you have flossed your entire tooth.
How Often Should I Floss With Braces?
Those with braces should floss at least twice per day in order to prevent plaque and tartar buildup as well as to remove food particles that can become trapped in metal braces or between clear aligners and teeth. It’s also important to floss after eating, or after each snack or meal, to ensure that no leftover particles or residue are remaining. These food particles can cause damage to brackets, bands, and metal braces, and they can wreak havoc if left to attract bacteria between aligners and teeth.
What Foods Item Should I Avoid With braces?
Avoiding food items tends to make cleaning and flossing simpler once you have braces. This consists of foods which are:
- Sticky
- Gooey
- Hard or Crunchy
- Sugary
While sticky foods can harm bands and brackets, difficult and crispy food items like apples and corn also can harm the teeth and metal braces. Stay away from foods that could also leave difficult-to-cean residue and particles including:
- Corn-on-the-Cob (Corn Silks)
- Starchy or Sugary Foods
- Caramel
- Popcorn
Although flossing with braces can be slightly more challenging than flossing without, it is still easy to incorporate a dental care personal hygiene plan that helps prevent plaque and tartar accumulation in your busy morning routine.